The Best Website for making Beginners from no knowledge to Professional
In my previous post I have created a detailed step by step process to create a login ui for your app but in this article I will explain How to Create Android App Firebase Email/Password Login for Absolute Beginners.
How to Create Android App Firebase Email/Password Login
Now that you’ve designed a beautiful login screen using XML, it’s time to make it work with Firebase Authentication. This guide will walk you through how to write the Java code in “MainActivity.java” renamed as “LoginActivity.java” so users can log in using their email and password.
If you miss the Login Screen UI tutorial, follow the link below or Click Here to see the Video Guide.
HOW TO CREATE A LOGIN UI FOR ANDROID APP
Please not that the renaming is optional and does not stop you from achieving same result. Want to rename Your? Follow the guide below but if you don’t wish to rename, just go on with everything below.
How to Rename Your Java File and Activity File
To rename a file (java or activity) right-click on the file, select Refactor > Rename. Enter your preferred new name and click on “Refactor”. Do the same for the activity file “activity_main.xml” file also.
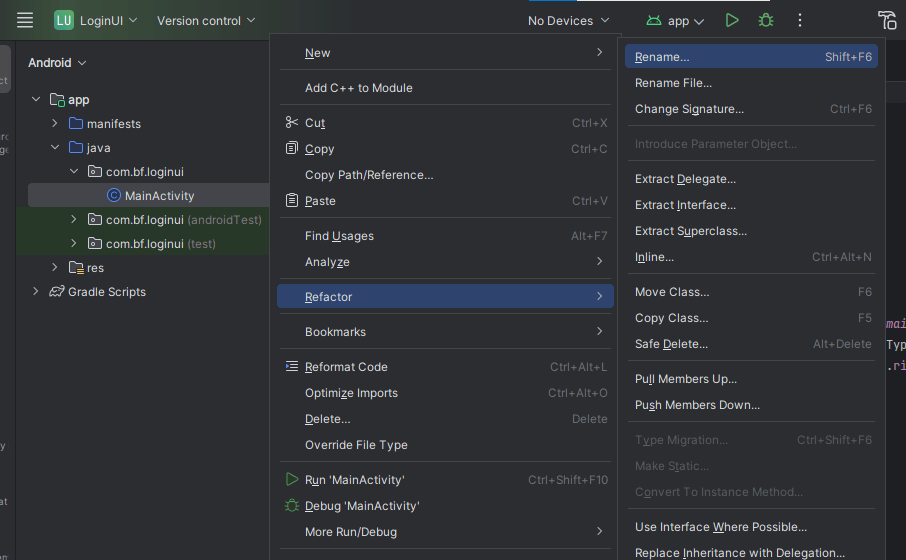
Now that you’ve renamed the “MainActivity.java” file to “LoginActivity.java”, let’s proceed to other part of this tutorial
We’ll use Firebase Authentication, which is a secure and easy-to-use login service provided by Google.
What You’ll Need
Before you write the code, make sure:
✅ Your project is connected to Firebase
✅ Firebase Authentication is enabled (Email/Password sign-in is turned ON in Firebase console)
✅ You’ve added the Firebase SDK to your build.gradle files
If you haven’t done that yet, follow this quick setup:
Step One: Open the Previous Project File
To start with making the login screen functional, you have to open the project where you’ve created the login screen, then navigate to app > java > com.bf.loginui. In your your own case “bf” may be anything you entered when you created the app
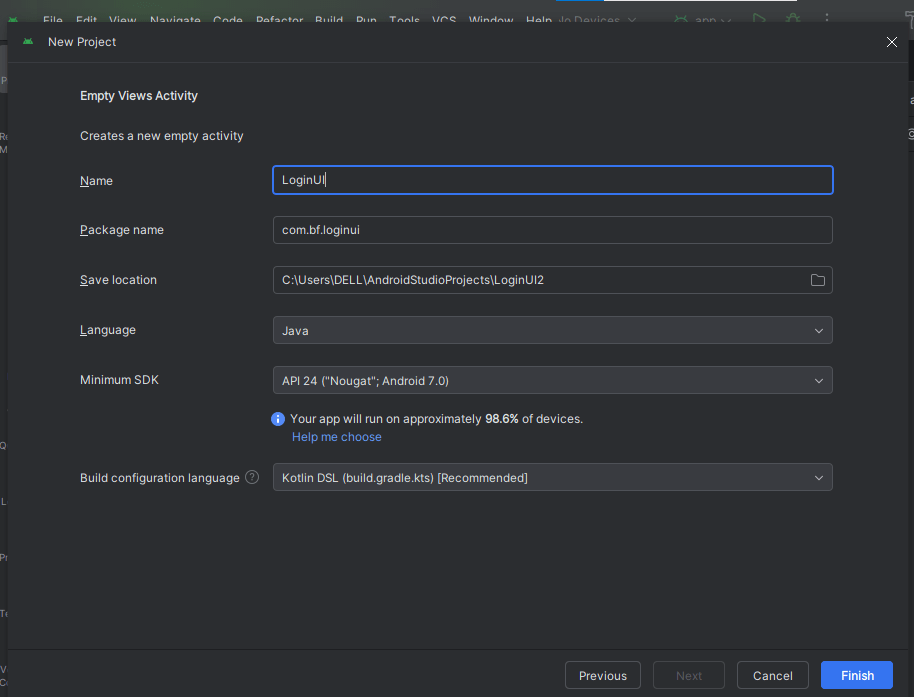
So this is exactly how yours should look like (as shown below)
Step 2: Add Firebase Authentication Dependencies
To add firebase authentication to your app, navigate to the Menubar area, Navigate to “Tools” section and Select “Firebase”. From the “Assistant” window opened on the right side of the screen, click on “Authenticate using a custom authentication system (java)” as shwon below
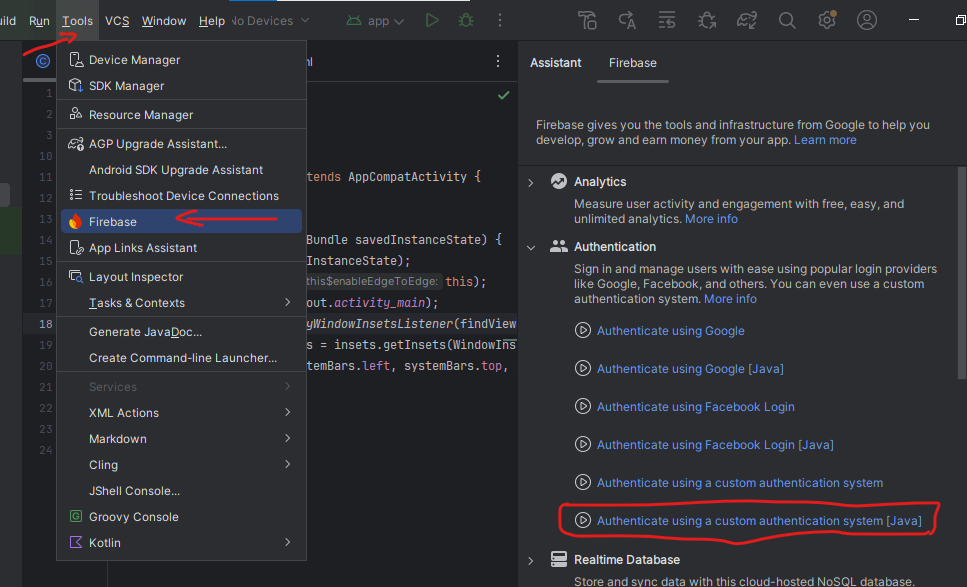
This will further show a prompt asking you to add Firebase SDK dependencies and to connect to Firebase console panel. Follow the Video guide in this article or the Image Illustrations for clear understanding of each steps
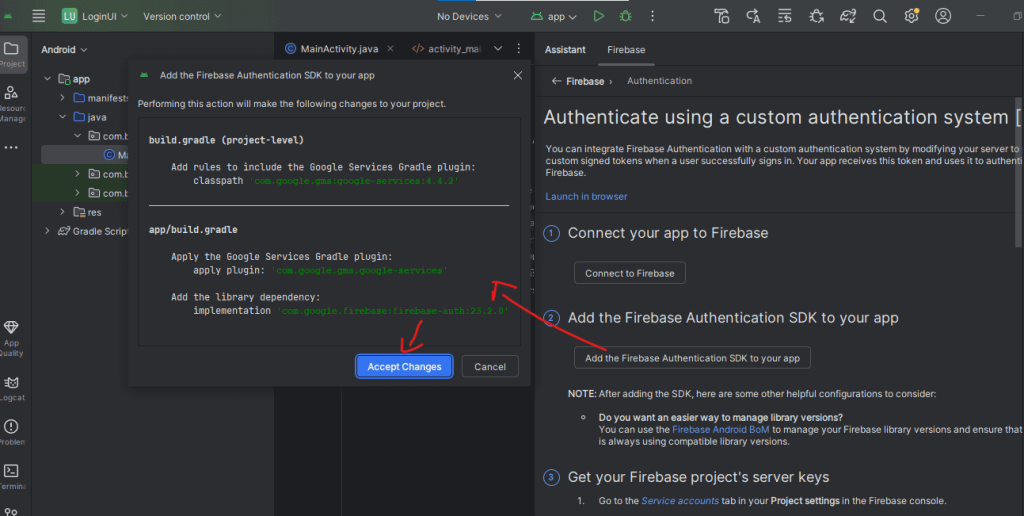
After adding the Firebase SDK dependencies, wait till your project fully build and sync with gradle after which you click on “Connect to Firebase” as shown in the image above. See below what you will have when you click on the connect with Firebase option.
Connecting Your App to Firebase Console
Now the next thing is to connect our app to Firebase Console. Click on the “Connect to Firebase” button as shown in the image above (don’t forget to have your system connected to the internet). Follow the prompt displayed after clicking the button and create an account to be able to access the Firebase Console.
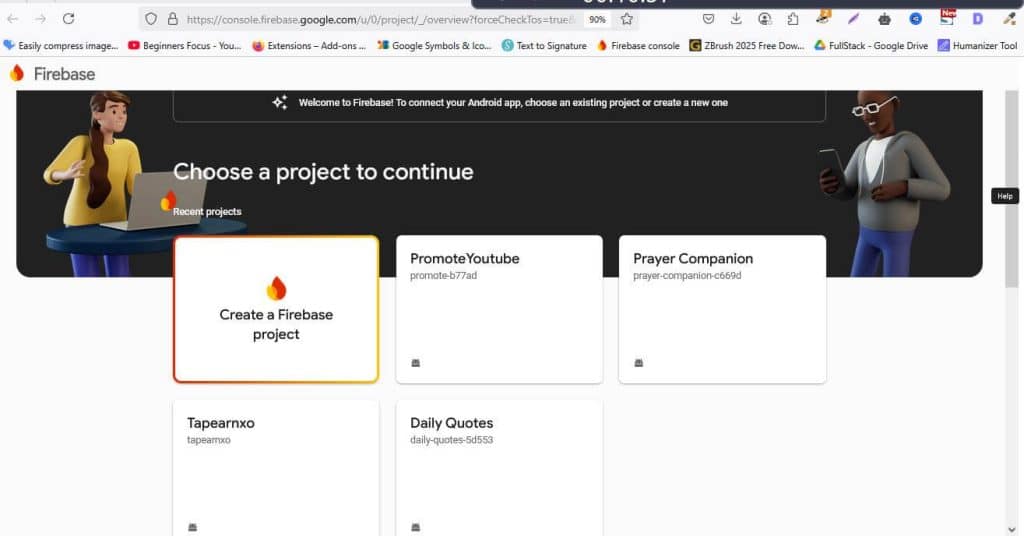
Click on the “Create a Firebase Project” to create a new Firebase project then follow through with the steps shown below.
- Give your project a name
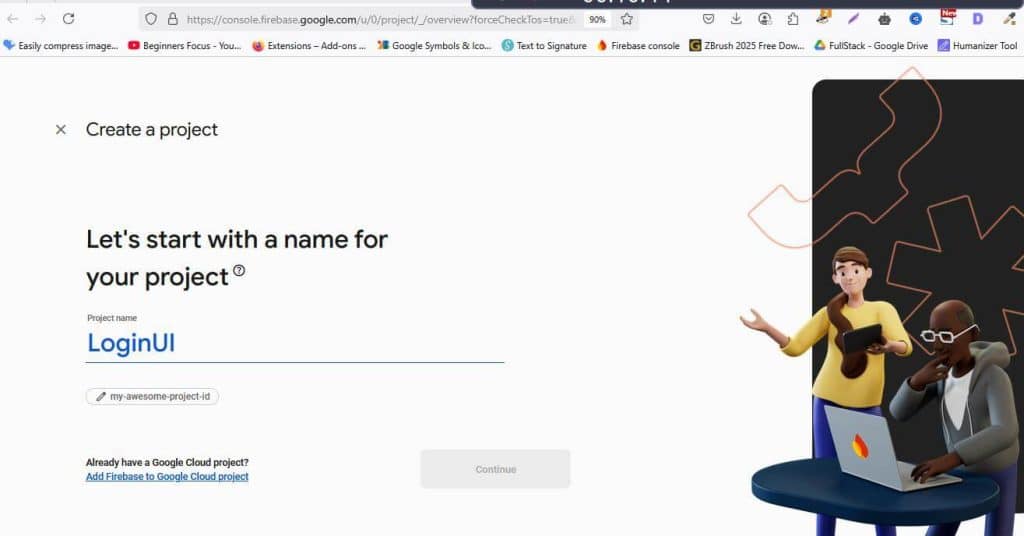
Click on “Continue” to continue to the next page which ask you to enable Gemini (It’s optional but recommended). The next page require you to enable “Google Analytics”(for monitoring app traffic) which is also optional but mostly recommended
If you choose to enable Google Analytics, you will need to create an account for analytics to keep record of user traffic for your app.
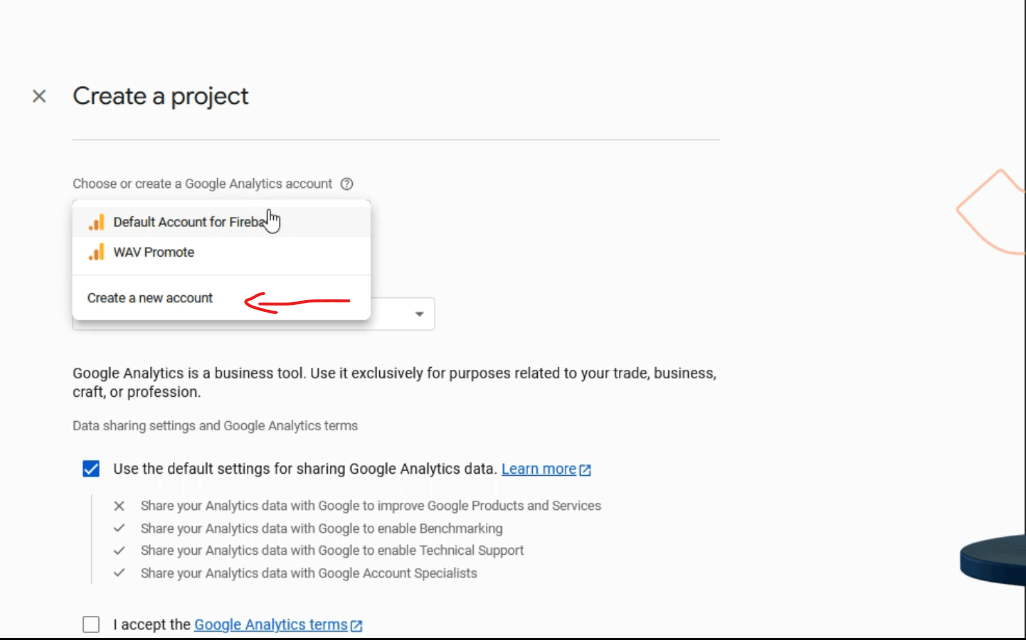
Follow through the other pages and you will have the screens below:
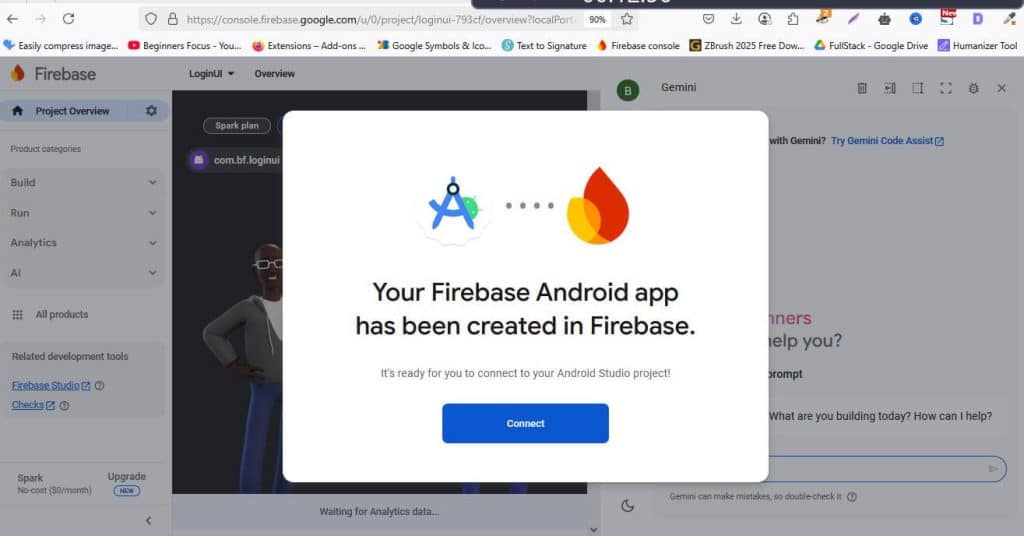
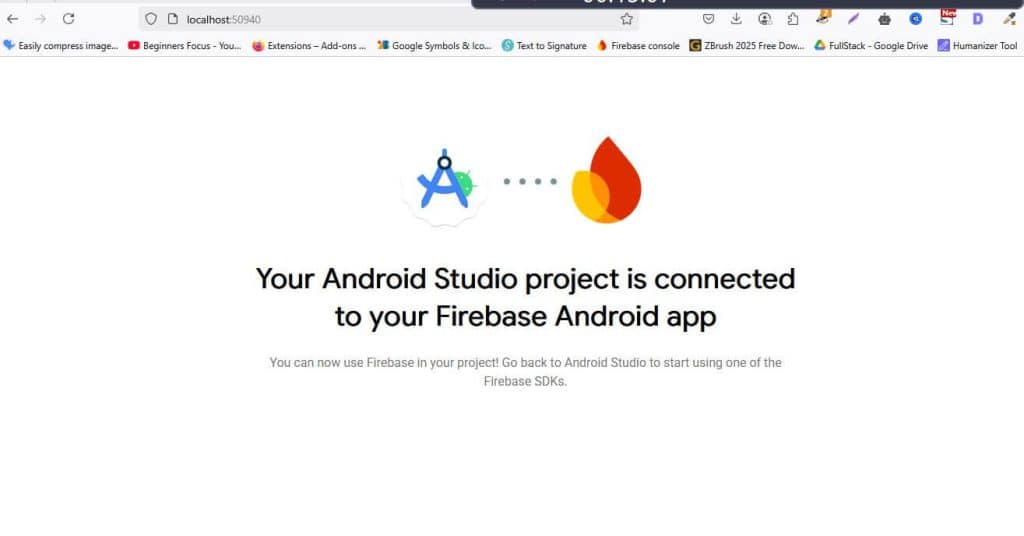
Now that you’ve successfully connected your app to Firebase, navigate to Firebase Homepage to choose your project.
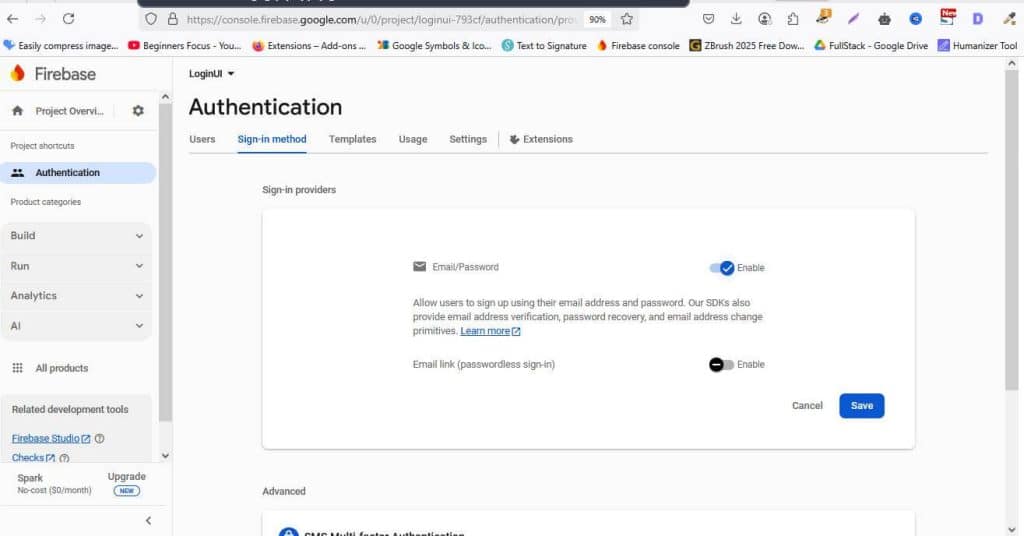
In the Firebase Console Dashboard, Click on Build on the Left panel and select “Authentication”. Click on get started and enable Email/Password login and click on save.
Let’s now write the Java code that connects the login UI to Firebase.
How to Create Android App LoginActivity.java
package com.bf.loginui;

import android.content.Intent;
import android.os.Bundle;
import android.text.TextUtils;
import android.view.View;
import android.widget.Button;
import android.widget.CheckBox;
import android.widget.EditText;
import android.widget.ProgressBar;
import android.widget.TextView;
import android.widget.Toast;

import androidx.annotation.NonNull;
import androidx.appcompat.app.AppCompatActivity;

import com.google.firebase.auth.FirebaseAuth;
import com.google.firebase.auth.FirebaseUser;

public class LoginActivity extends AppCompatActivity {

    EditText inputEmail, inputPassword;
    Button loginButton;
    TextView signupLink, forgotPasswordLink;
    CheckBox rememberMe;
    ProgressBar progressBar;

    FirebaseAuth mAuth;

    @Override
    protected void onCreate(Bundle savedInstanceState) {
        super.onCreate(savedInstanceState);
        setContentView(R.layout.activity_login);

        // Initialize Firebase Auth
        mAuth = FirebaseAuth.getInstance();

        // Find all views by ID
        inputEmail = findViewById(R.id.etEmail); // Use the correct ID
        inputPassword = findViewById(R.id.etPassword); // Use the correct ID
        loginButton = findViewById(R.id.loginButton); // Use the correct ID
        signupLink = findViewById(R.id.signupText); // Optional
        forgotPasswordLink = findViewById(R.id.forgotPasswordText); // Optional
        rememberMe = findViewById(R.id.rememberCheckBox); // Optional
        progressBar = findViewById(R.id.progressBar); // Optional loading bar

        // Login button click
        loginButton.setOnClickListener(new View.OnClickListener() {
            @Override
            public void onClick(View view) {
                loginUser();
            }
        });
    }

    private void loginUser() {
        // Get user input
        String email = inputEmail.getText().toString().trim();
        String password = inputPassword.getText().toString().trim();

        // Validate input
        if (TextUtils.isEmpty(email)) {
            inputEmail.setError("Email is required");
            return;
        }

        if (TextUtils.isEmpty(password)) {
            inputPassword.setError("Password is required");
            return;
        }

        if (password.length() < 6) {
            inputPassword.setError("Password must be at least 6 characters");
            return;
        }

        // Show progress
        if (progressBar != null) {
            progressBar.setVisibility(View.VISIBLE);
        }

        // Firebase login
        mAuth.signInWithEmailAndPassword(email, password)
            .addOnCompleteListener(this, task -> {
                if (progressBar != null) {
                    progressBar.setVisibility(View.GONE);
                }

                if (task.isSuccessful()) {
                    FirebaseUser user = mAuth.getCurrentUser();
                    Toast.makeText(LoginActivity.this, "Login successful", Toast.LENGTH_SHORT).show();

                    // Go to next screen (e.g., MainActivity)
                    startActivity(new Intent(LoginActivity.this, MainActivity.class));
                    finish(); // Prevent back to login
                } else {
                    Toast.makeText(LoginActivity.this, "Login failed: " + task.getException().getMessage(), Toast.LENGTH_LONG).show();
                }
            });
    }
}
Step 4: Match the IDs in Your XML
Make sure your activity_login.xml or activity_main.xml(for those who prefer not to rename the file) contains the right IDs for the Java code above to work. For example:
<EditText
    android:id="@+id/etEmail"
    ... />

<com.google.android.material.textfield.TextInputEditText
            android:id="@+id/etPassword"
            android:layout_width="match_parent"
            android:layout_height="wrap_content"
            android:minHeight="48dp"
            android:inputType="textPassword"
            android:paddingStart="15dp"
            android:textColor="@color/hint_color" />

<TextView
        android:id="@+id/signupText"
        android:layout_width="wrap_content"
        android:layout_height="wrap_content"
        android:text="Don't have account? Signup"
        android:textColor="@color/black"
        android:textSize="16sp"/>

<Button
    android:id="@+id/loginButton"
    ... />
Add a ProgressBar to your xml layout file.
<ProgressBar
    android:id="@+id/progressBar"
    android:layout_width="wrap_content"
    android:layout_height="wrap_content"
    android:visibility="gone"
    android:layout_gravity="center"/>
How to Create Android App Firebase Email/Password Login – Explanation
Here’s a breakdown of what the loginUser() function does:
- It collects the email and password from the user.
- It checks if they are empty or too short.
- It shows a progress bar while trying to log in.
- It calls Firebase to sign in.
- If successful, it opens the Main Activity(if main activity is not your login page) or your Home Activity.
- If failed, it shows an error message.
How to Create Android App Firebase (Email/Password) Login -Full Beginner Breakdown
This is not just a tutorial. It’s a complete beginner’s breakdown of how the Firebase login code works in Android — line by line, and why each part is written.
We’ll focus on the most confusing parts for beginners like:
FirebaseAuth mAuth;— What is this?mAuth = FirebaseAuth.getInstance();— Why do we write it?TextUtils.isEmpty()— What is this and why do we use it?if (progressBar != null)— What is this checking?- Firebase login function:
mAuth.signInWithEmailAndPassword(email, password) .addOnCompleteListener(this, task -> {We’ll break this entire block down.
🔹 1. What is FirebaseAuth mAuth;?
This line is:
FirebaseAuth mAuth;
👉 This is a variable declaration. You’re saying:
“Hey Java, I need a variable called
mAuththat will hold Firebase Authentication stuff.”
FirebaseAuthis a class from Firebase that helps you manage user login, signup, sign out, and more.mAuthis just a name you give. You could call itauthormyAuth— butmAuthis a common naming style meaning “My Authentication”.
🔹 2. What is mAuth = FirebaseAuth.getInstance();?
This line is:
mAuth = FirebaseAuth.getInstance();
👉 This means:
“Give me the current instance of FirebaseAuth so I can use it.”
What does .getInstance() mean?
FirebaseAuth.getInstance() is a built-in function that returns the current working FirebaseAuth object — so you can use it to log people in.
Without this line, mAuth is just an empty box. With it, mAuth becomes ready to work with Firebase.
🔹 3. What is TextUtils.isEmpty(email)?
This line is:
if (TextUtils.isEmpty(email)) {
👉 It means:
“Check if the email field is empty or just spaces.”
Let’s break it down:
TextUtilsis a helper class in Android that contains functions for working with text.isEmpty()is a method that checks: is the string null or “” (empty)?
✅ Example:
String email = "";
TextUtils.isEmpty(email); // true
Using this line helps you avoid errors like trying to log in without typing anything.
🔹 4. What does if (progressBar != null) mean?
This line:
if (progressBar != null) {
    progressBar.setVisibility(View.VISIBLE);
}
Means:
“If the
progressBaris not empty, then show the loading spinner.”
Why check if it’s not null?
Because if progressBar was never added to the XML or not linked using findViewById(), then using it will crash the app.
So we write != null to make sure it’s safe to use.
🔹 5. What does this whole Firebase login code mean?
Let’s break this line by line:
mAuth.signInWithEmailAndPassword(email, password)
    .addOnCompleteListener(this, task -> {
🔸 mAuth.signInWithEmailAndPassword(email, password)
This is a Firebase function that tries to log in the user using email and password.
emailandpasswordare the ones the user typed.- This function will go to Firebase online and check if the user exists and if the password is correct.
✅ Example:
If user types:
email = "user@example.com";
password = "mypassword";
Firebase will check if that user exists and if the password matches.
🔸 .addOnCompleteListener(this, task -> { ... })
This tells the app what to do after Firebase finishes the login process — whether it succeeded or failed.
Let’s break it down:
addOnCompleteListener()= “when done, do this”this= means the current screen (usuallyLoginActivity)task -> { ... }= This is a lambda (shortcut for writing a function) that tells what to do next.
Inside that block:
if (task.isSuccessful()) {
    // login worked
} else {
    // login failed
}
🔹 6. What is task.getException().getMessage()?
This is how you get the error message if the login fails.
✅ Example:
Toast.makeText(LoginActivity.this, "Login failed: " + task.getException().getMessage(), Toast.LENGTH_LONG).show();
Means:
Show a message like:
“Login failed: The password is invalid or the user does not have a password.”
Why use this?
Because Firebase gives detailed error messages like:
- Invalid email
- User not found
- Wrong password
You can show these to users instead of a boring “Login failed” message.
🔚 Summary Table
| Code | Meaning |
|---|---|
FirebaseAuth mAuth; | Create a variable to handle login |
mAuth = FirebaseAuth.getInstance(); | Connect the variable to Firebase |
TextUtils.isEmpty(text) | Checks if input is empty |
if (progressBar != null) | Makes sure progressBar exists before using |
signInWithEmailAndPassword() | Tries to log user in using Firebase |
addOnCompleteListener(..., task -> {}) | What to do after login result |
task.getException().getMessage() | Gets reason for login failure |


