The Best Website for making Beginners from no knowledge to Professional
In today’s article, i will teach step by step how to create a modern login Screen in Android Studio even as an absolute beginner who has never coded before or have any basic programming knowledge.
How to Create a Modern Login Screen in Android Studio (XML Layout)
A Login Screen is a fundamental part of any mobile app, allowing users to securely access their accounts. In this tutorial, we’ll design a modern and professional login screen in Android Studio using XML.

Why is a Login Screen Important in Android Development?
A login screen enhances user security and provides personalized experiences within an app. Here are some key reasons why it is essential:
- User Authentication: Ensures secure access to app features.
- Personalization: Customizes user experience based on login credentials.
- Data Protection: Prevents unauthorized access to sensitive information.
- Seamless Integration: Can be connected with Firebase, Google Sign-In, or social media logins.
READ ALSO HOW TO CREATE A SIGNUP/REGISTER SCREEN IN ANDROID
Types of Login Interfaces in Android Apps
Depending on the app requirements, various types of login interfaces can be implemented:
- Traditional Login Form – Email & Password fields with a Login button.
- Social Media Login – Allows users to sign in using Google, Facebook, or Twitter.
- Biometric Authentication – Uses fingerprint or face recognition for security.
- One-Time Password (OTP) Login – Sends a verification code to email or mobile number.
- Single Sign-On (SSO) – Enables users to log in with a single ID across multiple services.
- Passwordless Login: user are not required to use password to login but just email.
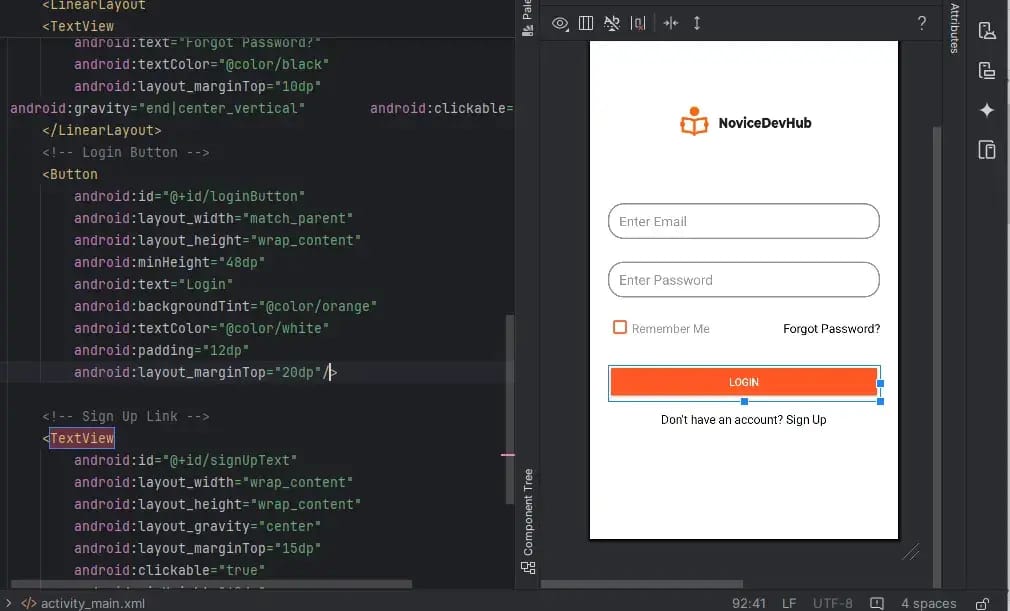
This UI will include: ✅ Email & Password Fields
✅ Remember Me Checkbox
✅ Forgot Password? Link
✅ Sign Up Link
✅ Styled Login Button
By the end of this guide, you’ll have a fully functional and visually appealing login screen UI. Let’s get started! 🚀
Step 1: Create a New Android Project
- Open Android Studio.
- Select New Project → Choose Empty Activity.
- Name the project LoginScreen and click Finish.
Now, navigate to res → layout and open activity_login.xml or create a new one if you’re using existing project.
Step 2: Steps to Create a Modern Login Screen
Replace the existing XML with the following code:
<?xml version="1.0" encoding="utf-8"?>
<LinearLayout
    xmlns:android="http://schemas.android.com/apk/res/android"
    android:layout_width="match_parent"
    android:layout_height="match_parent"
    android:orientation="vertical"
    android:gravity="center"
    android:padding="24dp"
    android:background="@color/white">

    <!-- App Logo -->
    <ImageView
        android:layout_width="100dp"
        android:layout_height="100dp"
        android:src="@mipmap/ic_launcher"
        android:contentDescription="App Logo"/>

    <!-- Email Input -->
    <EditText
        android:id="@+id/emailEditText"
        android:layout_width="match_parent"
        android:layout_height="wrap_content"
        android:hint="Enter Email"
        android:inputType="textEmailAddress"
        android:padding="12dp"/>

    <!-- Password Input -->
    <EditText
        android:id="@+id/passwordEditText"
        android:layout_width="match_parent"
        android:layout_height="wrap_content"
        android:hint="Enter Password"
        android:inputType="textPassword"
        android:padding="12dp"/>

    <!-- Remember Me Checkbox -->
    <CheckBox
        android:id="@+id/rememberMeCheckbox"
        android:layout_width="wrap_content"
        android:layout_height="wrap_content"
        android:text="Remember Me"/>

    <!-- Forgot Password -->
    <TextView
        android:id="@+id/forgotPasswordText"
        android:layout_width="wrap_content"
        android:layout_height="wrap_content"
        android:text="Forgot Password?"
        android:textColor="@color/teal_700"
        android:textSize="14sp"
        android:clickable="true"/>

    <!-- Login Button -->
    <Button
        android:id="@+id/loginButton"
        android:layout_width="match_parent"
        android:layout_height="wrap_content"
        android:text="Login"
        android:backgroundTint="@color/teal_700"
        android:textColor="@android:color/white"
        android:padding="12dp"/>

    <!-- Sign Up Link -->
    <TextView
        android:id="@+id/signUpText"
        android:layout_width="wrap_content"
        android:layout_height="wrap_content"
        android:text="Don't have an account? Sign Up"
        android:textColor="@color/black"
        android:textSize="14sp"
        android:clickable="true"/>
</LinearLayout>
Step 3: Explanation of the UI Components
🔹 LinearLayout → Arranges UI elements vertically.
🔹 ImageView → Displays an app logo.
🔹 EditText (Email & Password) → Fields for login credentials.
🔹 CheckBox → Adds a “Remember Me” feature.
🔹 TextView (Forgot Password & Sign Up) → Provides navigation options.
🔹 Button (Login) → Styled button for submitting credentials.
Input Field Styling Below:
<?xml version="1.0" encoding="utf-8"?>
<shape
    xmlns:android="http://schemas.android.com/apk/res/android">
    <corners
        android:topLeftRadius="20dp"
        android:bottomLeftRadius="20dp"
        android:topRightRadius="20dp"
        android:bottomRightRadius="20dp" />
    <stroke
        android:color="@color/app_icon"
        android:width="2dp"/>
</shape>
Step 4: Running & Previewing the UI
- Click Run ▶️ to launch the emulator.
- Test the input fields, checkbox, and clickable links.
- 🎉 Your modern login screen is now complete!
Final Thoughts
🚀 Congratulations! You have successfully designed a modern login screen in Android Studio using XML.
📌 Next Steps:
🔹 Learn how to create this same UI using Jetpack Compose → (Coming Soon)
🔹 Implement Firebase Authentication to make this login functional → Check YouTube Channel
💬 Did you find this tutorial helpful? Drop a comment below! Don’t forget to share and subscribe for more Android tutorials. 🚀


