The Best Website for making Beginners from no knowledge to Professional
Creating a smooth and attractive signup screen is one of the first steps in building a great Android app. In this article we will look at how to create a signup screen UI in Android Studio step by step and explaining important terms.
A signup screen helps users register and start using an app. A signup is mostly used in app that requires:
- User authentication before accessing a app
- Saving user records
- Updating user records
I will show you step-by-step how to create a modern signup screen UI in Android Studio, even if you are a beginner.
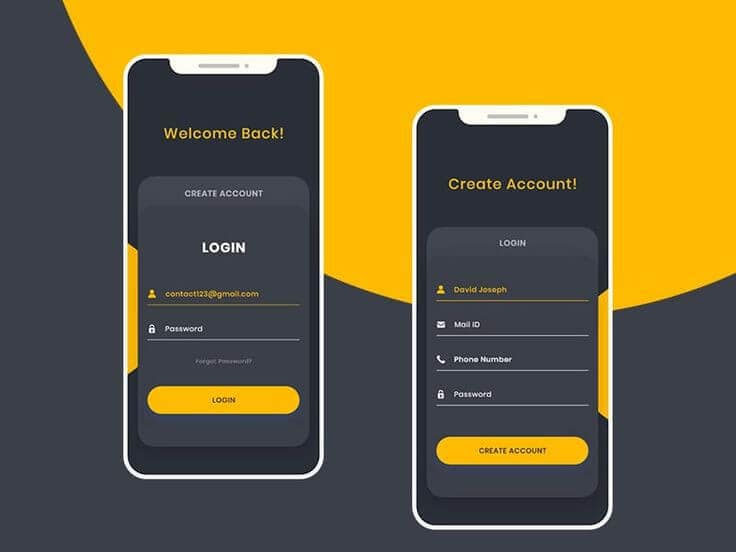
We will be inspired by clean and professional designs like the ones you see in the images above: a dark theme with yellow buttons and a light theme with blue buttons.
What You Will Learn
- How to set up a new project in Android Studio
- How to design a signup screen using XML
- How to style input fields and buttons
- How to make your design look professional
Tools You Need
- Android Studio (latest version recommended)
- Basic knowledge of XML (we will explain it very simply)
- A little patience and creativity
Step 1: Create a New Android Studio Project
Open Android Studio.
Click on “New Project”.
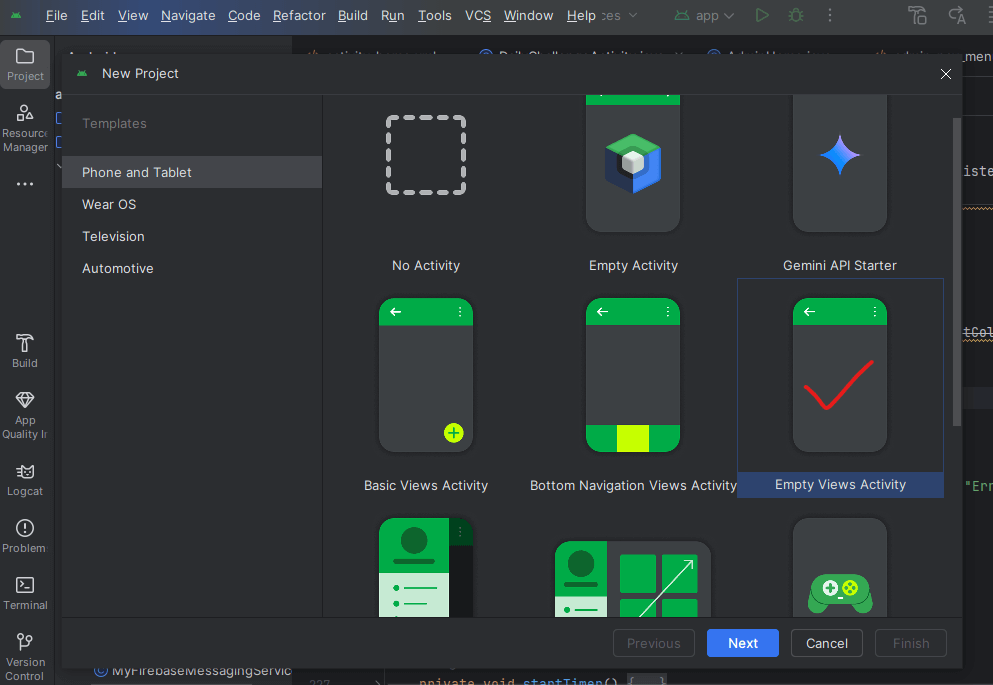
Choose Empty Views Activity and click Next.
Name your project (for example:
SignupScreenUI).Set the language to Java or Kotlin (we’ll use XML for the UI).
Click Finish and wait for the project to load.
Make sure your computer is connected to the internet as this will be needed to download some files and project dependencies to make your project ready.
Step 2: Setup the Signup Screen Layout
You will work mainly in the activity_main.xml file.
Go to: app > res > layout > activity_main.xml

How to create a Signup Screen UI Step by Step
Below is a visual representation of the Signup Screen UI we will be designing.

READ ALSO: BEGINNERS GUIDE TO ANDROID DEVELOPMENT
Replace the default code within the activity_main.xml layout file with the ones below.
<?xml version="1.0" encoding="utf-8"?>
<LinearLayout
    android:orientation="vertical"
    xmlns:android="http://schemas.android.com/apk/res/android"
    android:layout_width="match_parent"
    android:layout_height="match_parent"
    android:background="@drawable/app_bg">
    <TextView
        android:id="@+id/signupTxt"
        android:layout_width="wrap_content"
        android:layout_height="wrap_content"
        android:text="Create Account"
        android:layout_gravity="center"
        android:textSize="26sp"
        android:textStyle="bold"
        android:layout_marginTop="70dp"
        android:textColor="@color/yellow_two"
        android:layout_marginBottom="72dp" />

    <RelativeLayout
        android:layout_width="match_parent"
        android:layout_height="wrap_content"
        android:gravity="center"
        android:padding="15dp">
        <LinearLayout
            android:paddingBottom="50dp"
            android:paddingStart="10dp"
            android:paddingEnd="10dp"
            android:orientation="vertical"
            android:layout_width="match_parent"
            android:layout_height="wrap_content"
            android:gravity="center"
            android:background="@drawable/container_bg" >

            <Button
                android:id="@+id/loginTxt"
                android:layout_width="match_parent"
                android:layout_height="wrap_content"
                android:backgroundTint="@color/black_shade"
                android:text="Login"
                android:padding="10dp"
                android:textSize="26sp"
                android:textStyle="bold"
                android:textColor="@color/white"
                android:layout_marginBottom="32dp" />

            <EditText
                android:id="@+id/etName"
                android:layout_width="match_parent"
                android:layout_height="50dp"
                android:minHeight="48dp"
                android:hint="Full Name"
                android:textSize="17sp"
                android:drawableStart="@drawable/ic_person"
                android:drawableTint="@color/yellow"
                android:textColorHint="@color/yellow"
                android:foregroundTint="@color/yellow"
                android:drawablePadding="10dp"
                android:layout_marginBottom="16dp" />

            <EditText
                android:id="@+id/etEmail"
                android:layout_width="match_parent"
                android:layout_height="50dp"
                android:hint="Email Address"
                android:padding="10dp"
                android:textSize="17sp"
                android:drawableStart="@drawable/ic_email"
                android:drawableTint="@color/white"
                android:textColorHint="@color/white"
                android:drawablePadding="10dp"
                android:backgroundTint="@color/white"
                android:layout_marginBottom="16dp" />

            <EditText
                android:id="@+id/etPhone"
                android:layout_width="match_parent"
                android:layout_height="50dp"
                android:hint="Phone Number"
                android:padding="10dp"
                android:textSize="17sp"
                android:drawableStart="@drawable/ic_phone"
                android:drawableTint="@color/white"
                android:textColorHint="@color/white"
                android:drawablePadding="10dp"
                android:backgroundTint="@color/white"
                android:layout_marginBottom="16dp" />

            <EditText
                android:id="@+id/etPassword"
                android:layout_width="match_parent"
                android:layout_height="50dp"
                android:hint="Password"
                android:padding="10dp"
                android:inputType="textPassword"
                android:textSize="17sp"
                android:drawableStart="@drawable/ic_lock"
                android:drawableTint="@color/white"
                android:textColorHint="@color/white"
                android:drawablePadding="10dp"
                android:backgroundTint="@color/white"
                android:layout_marginBottom="44dp" />

            <Button
                android:id="@+id/btnSignUp"
                android:layout_width="match_parent"
                android:layout_height="50dp"
                android:text="SIGN UP"
                android:backgroundTint="#FFBB00"
                android:textColor="#000000"
                android:textStyle="bold" />

        </LinearLayout>
    </RelativeLayout>
</LinearLayout>
Firstly we started with a LinearLayout as the parent container of the Signup UI.
We define a custom background for the signup form section called “container_bg.xml”
Background Shape (container_bg.xml) This drawable file gives the signup form rounded corners and a border.

<?xml version="1.0" encoding="utf-8"?>
<shape xmlns:android="http://schemas.android.com/apk/res/android">
    <corners android:radius="25dp"/>
    <stroke android:color="@color/black_shade" android:width="1dp"/>
    <solid android:color="@color/black_shade2"/>
</shape>
Color Definitions (colors.xml)
We define custom Colors inside the (colors.xml) file. This is where you set the colors used in your layout. Colors I used in the design are shown below:
These custom colors are used throughout the layout to make the UI visually consistent.

<resources>
    <color name="black">#FF000000</color>
    <color name="white">#FFFFFFFF</color>
    <color name="blue">#2e346e</color>
    <color name="ash">#ccd0db</color>
    <color name="yellow">#ffbb00</color>
    <color name="yellow_two">#f8c01d</color>
    <color name="black_shade">#32363e</color>
    <color name="black_shade2">#3b3f48</color>
</resources>
Other elements used in the code explained below:
- Used
android:drawableStartto add icons insideEditText - Used
backgroundTintto add the underline-like color inside the input area (EditText) - Used
shapein drawable files to create rounded containers - Use consistent padding and margins to make the layout look clean
LinearLayout – Why do we use LinearLayout?
We use a vertical LinearLayout as the base container becaause it allow us to place elements vertical or horizontally by just declaring the orientation.
Inside it, we place a heading (Create Account) and a RelativeLayout that wraps a LinearLayout styled like a card(Signup forms). This layout holds input fields for full name, email, phone number, and password, plus buttons for login and signup.
Glossary: Key Terms Explained (Signup Screen UI)
| Term | Meaning |
|---|---|
| LinearLayout | A layout that arranges child views either vertically or horizontally in a single direction. |
| RelativeLayout | A layout where child elements are positioned relative to each other or the parent container. |
| TextView | A UI element used to display static text on the screen. |
| EditText | A text input field where users can type information (e.g., name, email). |
| Button | A clickable element used to trigger actions like submitting a form or logging in. |
| Drawable | A graphic resource (like an icon or background shape) used in layouts. |
| @drawable/ | A reference to an image or XML shape stored in the res/drawable folder. |
| @color/ | A reference to a color defined in res/values/colors.xml. |
| android:hint | Placeholder text shown inside an EditText field before the user types. |
| android:drawableStart | Adds an icon at the beginning (left side) of the EditText. |
| android:backgroundTint | Tints the background color of a UI element like EditText or Button. |
| sp (scale-independent pixels) | A unit of text size that scales based on the user’s font size preference. |
| dp (density-independent pixels) | A unit of layout size that remains consistent across different screen densities. |
Frequently Asked Questions (FAQs)
1. Can I make the signup screen dark mode?
Yes! Just change the background color of the ScrollView to a dark color like #121212 and adjust text/button colors to be lighter.
2. How can I validate the inputs?
You can add simple Java/Kotlin code in MainActivity.java to check if fields are empty before submitting.
3. Can I use images or illustrations?
Yes! You can add ImageView at the top of the screen to make your signup page more attractive.
You can follow my channel on Youtube for more updates


