The Best Website for making Beginners from no knowledge to Professional
Learn how to design a modern “Signup Screen Layout in Android” using XML in Android Studio. Step-by-step guide with best UI practices and accessibility tips.
Purpose of Signup Screen Layout in Android?
The signup screen is one of the most important UI components in an Android application. It serves as the first interaction point where users create their accounts and gain access to app features. A well-designed signup screen enhances user experience, encourages engagement, and ensures seamless authentication.
Key Benefits:
- Improved User Retention: A smooth and error-free signup process reduces friction and encourages users to complete the registration.
- User Onboarding: Provides a structured way for new users to sign up and start using the app.
- Data Collection: Helps in gathering essential user details like email, username, and password.
- Security & Authentication: Ensures secure login credentials using best practices like input validation and encryption.
- Brand Identity: Creates a visually appealing first impression that aligns with the app’s overall theme and usability.
How to Create Signup Screen Layout in Android
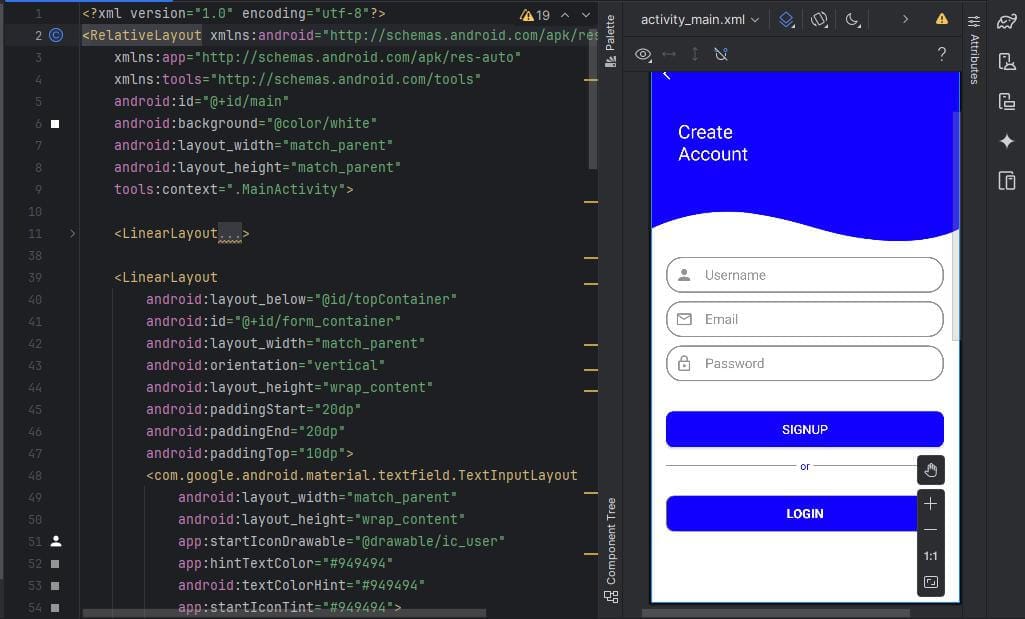
A well-designed signup screen is a crucial component of any Android app, providing users with a smooth onboarding experience. In this tutorial, you’ll learn how to create a user-friendly “Create Account” layout using XML in Android Studio. We’ll follow best UI practices, ensuring a clean and modern design.

Prerequisites
Before we begin, make sure you have the following:
- Android Studio installed
- Latest Android SDK & Emulator
- Java Development Kit Installed
- Basic knowledge of XML and Android UI components
If you’ve not installed android studio or don’t know how to setup android studio watch the video below:
Step-by-Step Guide
1. Create a New Layout File
Open Android Studio, select a New Project then Select an Empty Views Activity as shown below. Watch the video below for complete process of create a new project.

After the project files has been successfully loaded, navigate to res/layout. Opena the activity_main.XML layout file and add the following code:
<?xml version="1.0" encoding="utf-8"?>
<RelativeLayout xmlns:android="http://schemas.android.com/apk/res/android"
    xmlns:app="http://schemas.android.com/apk/res-auto"
    xmlns:tools="http://schemas.android.com/tools"
    android:id="@+id/main"
    android:background="@color/white"
    android:layout_width="match_parent"
    android:layout_height="match_parent"
    tools:context=".MainActivity">
2. Add the Header Section
The top section contains a back button and a title:
<LinearLayout
    android:id="@+id/topContainer"
    android:layout_width="match_parent"
    android:layout_height="250dp"
    android:orientation="vertical"
    android:padding="16dp"
    android:background="@drawable/top_bg">

    <ImageView
        android:layout_width="20dp"
        android:layout_height="20dp"
        android:layout_marginBottom="50dp"
        android:contentDescription="BACK"
        android:src="@drawable/ic_back"/>

    <TextView
        android:layout_width="100dp"
        android:layout_height="wrap_content"
        android:textSize="25sp"
        android:lineSpacingMultiplier="1"
        android:lines="2"
        android:layout_marginStart="20dp"
        android:textColor="@color/white"
        android:text="Create Account"/>
</LinearLayout>
3. Add Input Fields
Use TextInputLayout to provide a modern input experience for username, email, and password.
<com.google.android.material.textfield.TextInputLayout
    android:layout_width="match_parent"
    android:layout_height="wrap_content"
    app:startIconDrawable="@drawable/ic_user">

    <com.google.android.material.textfield.TextInputEditText
        android:id="@+id/username"
        android:layout_width="match_parent"
        android:layout_height="wrap_content"
        android:hint="Username"/>
</com.google.android.material.textfield.TextInputLayout>
Repeat the above TextInputLayout for email and password, changing the android:hint and android:inputType accordingly.
4. Add the Signup Button
<Button
    android:id="@+id/btn_signup"
    android:layout_width="match_parent"
    android:layout_height="wrap_content"
    android:background="@drawable/btnsignup_border"
    android:text="Signup"/>
5. Add the Login Option
<Button
    android:id="@+id/btn_login"
    android:layout_width="match_parent"
    android:layout_height="wrap_content"
    android:background="@drawable/login_btn_border"
    android:text="Login"/>
Best UI Practices
- Use Material Design components for a modern look.
- Maintain proper spacing and alignment to enhance readability.
- Provide feedback using hints, icons, and error messages.
Accessibility Enhancements
- Add
contentDescriptionto ImageView for screen readers. - Use high contrast colors for better readability.
- Ensure touch-friendly buttons with appropriate padding.
Conclusion
In this tutorial, you learned how to design a “Create Account Layout in Android” using XML, incorporating best UI practices and accessibility tips.
What’s next? ✅ Watch the full tutorial on YouTube ✅ Subscribe for more Android tutorials ✅ Download the sample project for practice


You’ve made even the simplest ideas feel profound with the care and depth you bring to your writing.