The Best Website for making Beginners from no knowledge to Professional
Are you new to Android development? I will walk you through this step-by-step beginner’s guide on the first 10 things to do after installing Android Studio for a smooth start.
Maybe you’ve just installed Android Studio, well I say congratulations!
What’s Android Studio For Android Development
It’s the official IDE for Android app development and your gateway to creating apps with Java or Kotlin.
It’s a easy thing to install Android Studio but it’s another thing to have it setup correctly. Most beginners get stuck right after installation. They open the software, stare at the screen, and think: what do I do next and the worst thing is most YouTube videos don’t cover the basics to help you get started as a total noobs.
This guide will walk you through 10 essential setup steps to prepare Android Studio for smooth, beginner-friendly app development while avoiding the most common newbie mistakes.
How to Get Started with Android Development As A Beginner – Android Studio Setup
1. Update Android Studio to the Latest Version
Before you start coding, make sure you’re running the latest stable version.
Updates fix bugs, improve speed, and add new tools you’ll definitely want. For example, the latest version has Gemini AI integrated to help you easily debug or get easier help. I call it coding companion for newbies even though I have not actually used it for once.
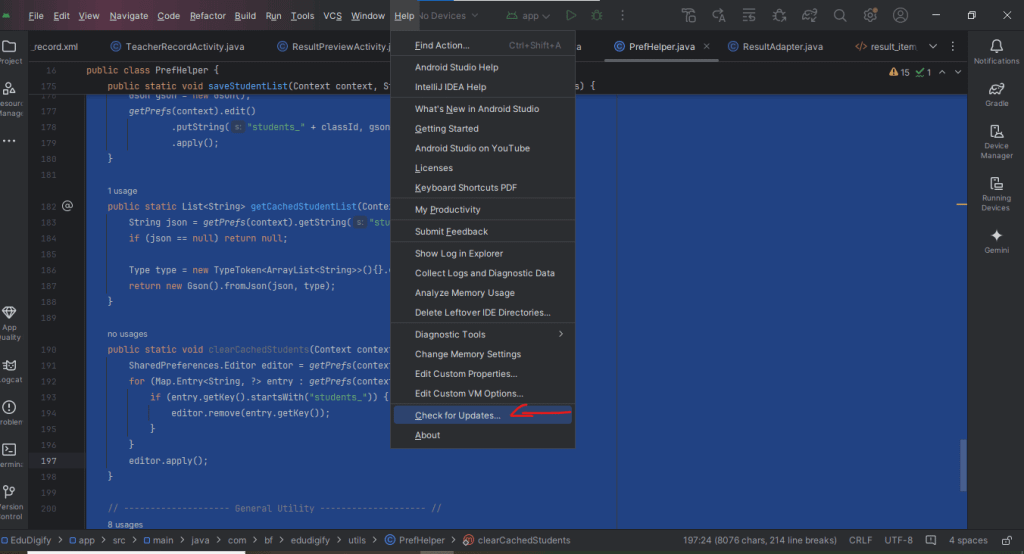
How to check for updates:
- Open Android Studio
- Go to Help > Check for Updates (Windows) or Android Studio > Check for Updates (Mac)
- Install if updates are available.
Tip: Always update before starting a big project to avoid compatibility issues later.
2. Install the Latest SDK & Tools
The SDK (Software Development Kit) is what lets your computer build and run Android apps.
How to install SDK updates:
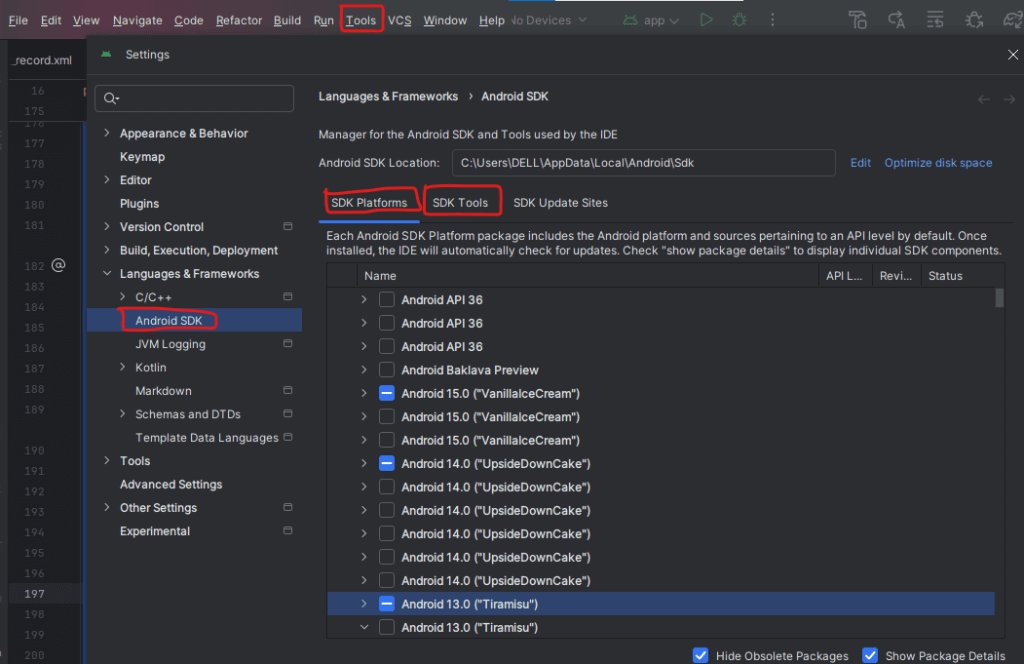
- Go to Tools > SDK Manager
- Under SDK Platforms, select at least API Level 21 (Lollipop) and newer versions
- Under SDK Tools, check:
- Android SDK Build-Tools
- Android Emulator
- Google USB Driver (Windows only)
Beginner tip: API Level 33+ is great for modern devices, but keep older APIs for backward compatibility.
3. Configure the Emulator (AVD)
The Android Emulator lets you run apps without a physical phone.
To create one:
- Go to Tools > Device Manager > Create Device
- Pick a device like Pixel 4
- Select a system image (preferably the latest stable Android version)
- Click Finish
For faster performance, enable Hardware Acceleration (HAXM) if your CPU supports it.
4. Enable Code Auto-Completion & Suggestions
As a beginner, code auto-complete will save you from endless typos and guesswork.
To check:
- Go to File > Settings > Editor > Code Completion
- Ensure Show suggestions as you type is enabled.
This will help you learn Java/Kotlin syntax as you code.
5. Set the Default Theme & Font Size
Coding for hours can strain your eyes.
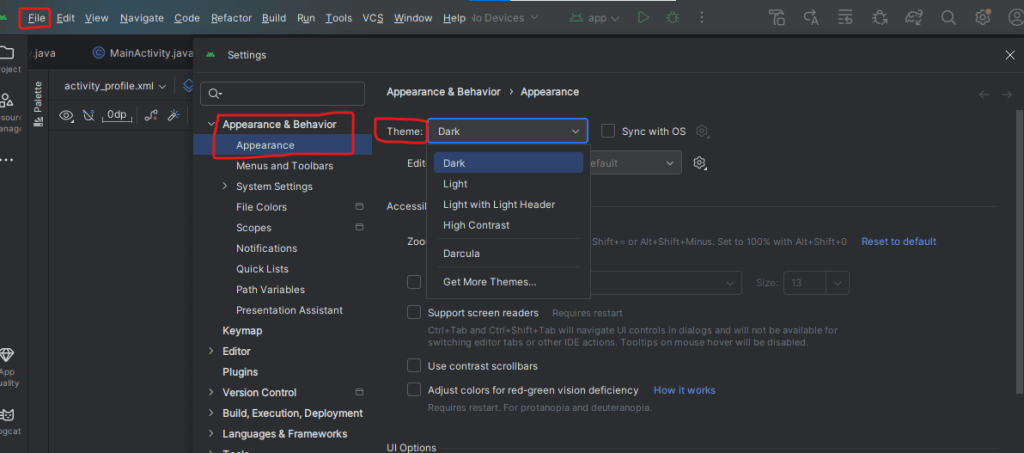
To change theme:
- Go to File > Settings > Appearance & Behavior > Appearance
- Choose Darcula (dark mode) or Light mode.
To change font size:
- Go to Editor > Font and set it to something comfortable like 14–16pt.
6. Install Essential Plugins for Beginners
Plugins add features to Android Studio that make life easier.
Recommended for beginners:
- Key Promoter X → Teaches keyboard shortcuts
- ADB Idea → Quick app restarts and uninstall
- Material Theme UI → Cleaner look and icons
To install plugins:
- Go to File > Settings > Plugins > Marketplace and search.
7. Link Your Physical Android Device
The emulator is great, but real devices give the best testing experience.
Steps to connect your phone:
- On your phone, go to Settings > About Phone > Tap “Build Number” 7 times to enable Developer Options.
- Go to Developer Options and turn on USB Debugging.
- Connect your phone to your PC with a USB cable.
8. Create Your First “Hello World” Project
Let’s test if everything is working.
Steps:
- Go to File > New Project
- Select Empty Activity
- Name your app (e.g., “HelloWorld”)
- Choose Java or Kotlin as the language
- Click Finish and run the app on your emulator or phone.
9. Learn Basic Shortcuts to Save Time
Knowing shortcuts early will make coding faster.
Useful for beginners:
- Ctrl + Space → Code suggestions
- Shift + Shift → Search anywhere
- Ctrl + / → Comment/uncomment lines
- Ctrl + D → Duplicate highlighted code section, line or block
- Ctrl + Alt + S → Open Settings Panel
10. Explore Android Studio’s Help & Documentation
When stuck, the built-in help menu and official docs are your best friend.
Resources:
- Help > Help Topics inside Android Studio
- developer.android.com
- Stack Overflow Android Tag
Common Beginner Mistakes to Avoid
- Installing too many plugins at once (slows Android Studio)
- Ignoring SDK updates (can cause build errors)
- Testing only on the emulator (misses real-world device behavior)
Final Words
You’ve now set up Android Studio the right way!
With these steps done, you’re ready to start building real apps without the frustration most beginners face.
Next, I recommend reading:


Thanks! I have been following your blog for weeks now and I can say your contents are really helping absolute beginners